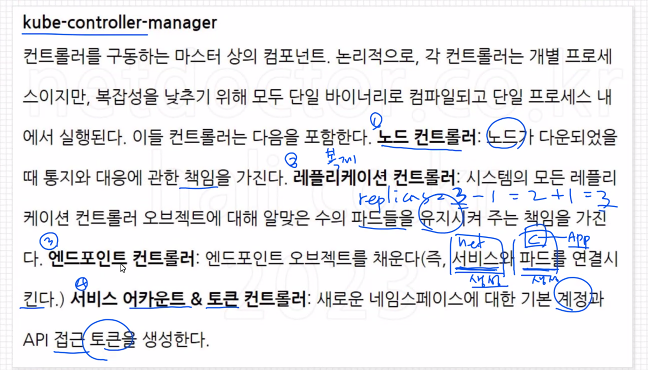
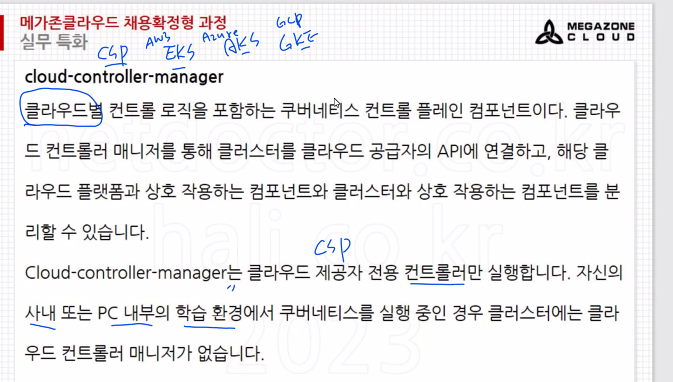
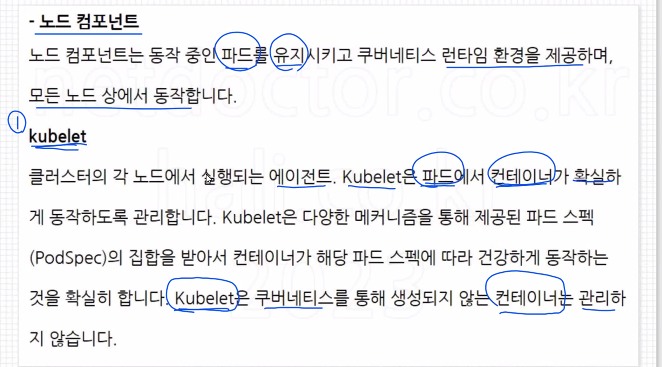
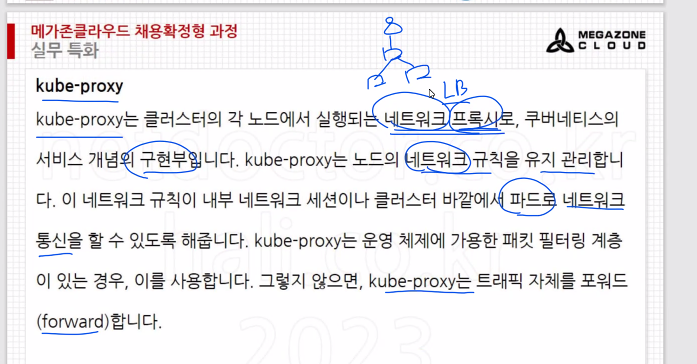
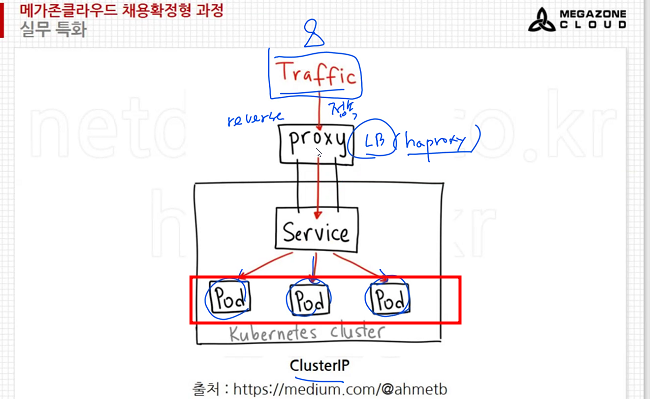
# 쿠버네티스 아키텍처

- 여러 서버들은 api server로 연결되고 api server는 etcd안에 데이터들을 저장한다.
- node들은 api server와 연결되서 pod를 만든다.

# VM 생성
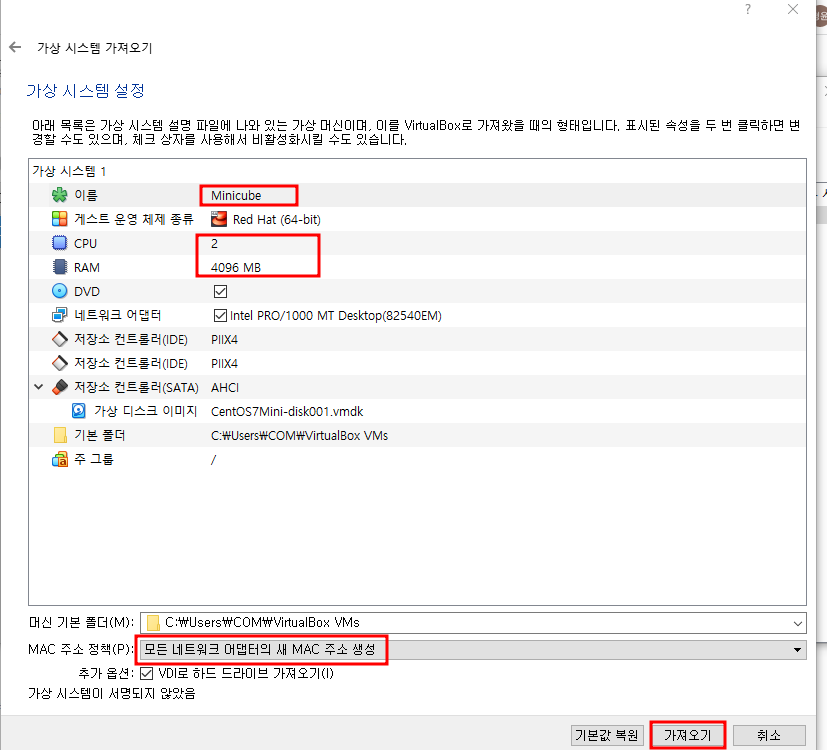
- ova 파일로 가져오기
- 설정 -> 네트워크 -> 고급에서 맥주소 새로고침
- yum update -y
# Minikube 설치(Single Node: Master Node + Worker Node)
# hostnamectl set-hostname minikube
# curl -fsSL https://get.docker.com/ | sudo sh
# systemctl enable --now docker
# yum install -y conntrack git
# curl -Lo minikube https://storage.googleapis.com/minikube/releases/v1.23.2/minikube-linux-amd64 && chmod +x minikube
# mkdir -p /usr/local/bin/ # 경로가 없을시 만든다, 대부분 있음
# install minikube /usr/local/bin/
# minikube version
# minikube start --driver=none # minikbe 시작
# minikube status
- minikube start --driver=none; minikube 시작
# kubectl 설치
# curl -LO https://dl.k8s.io/release/v1.22.2/bin/linux/amd64/kubectl
# install -o root -g root -m 0755 kubectl /usr/local/bin/kubectl
# yum install bash-completion -y
# source <(kubectl completion bash)
# echo "source <(kubectl completion bash)" >> ~/.bashrc
# exit
# kubectl version
# CLI 기본 사용법
## nginx pod 생성
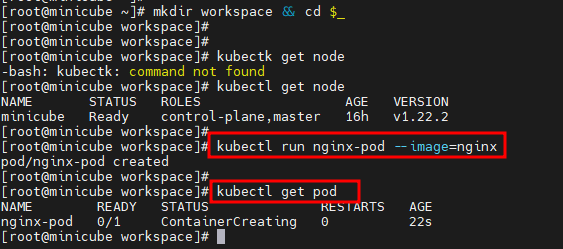
- nginx 이미지를 활용하여 pod 객체를 만든다.
## ClusterIP 서비스
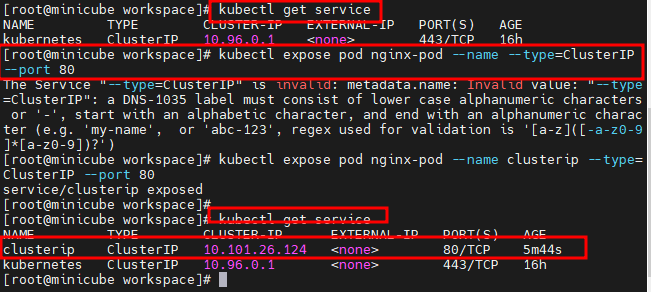
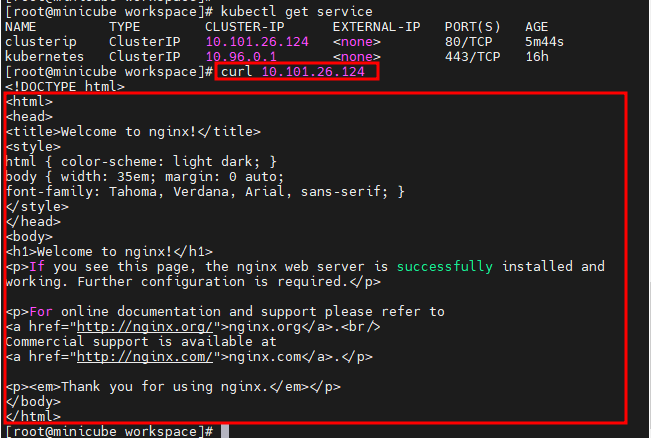
- cluster ip 서비스 생성
- 클러스터 내부에서만 접근할 수 있는 IP를 할당
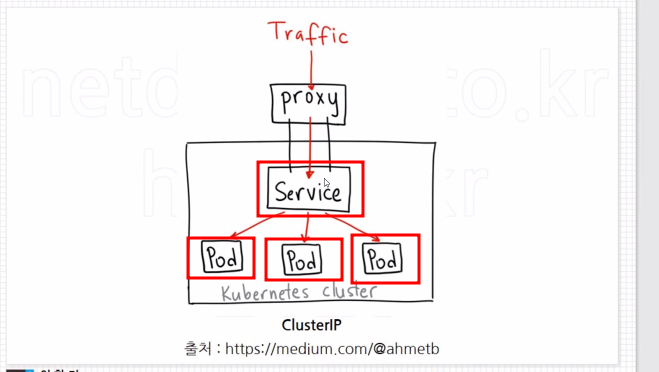
- ClusterIP 서비스를 통해서 Pod를 만들고 내부에서 사용할 IP 할당.
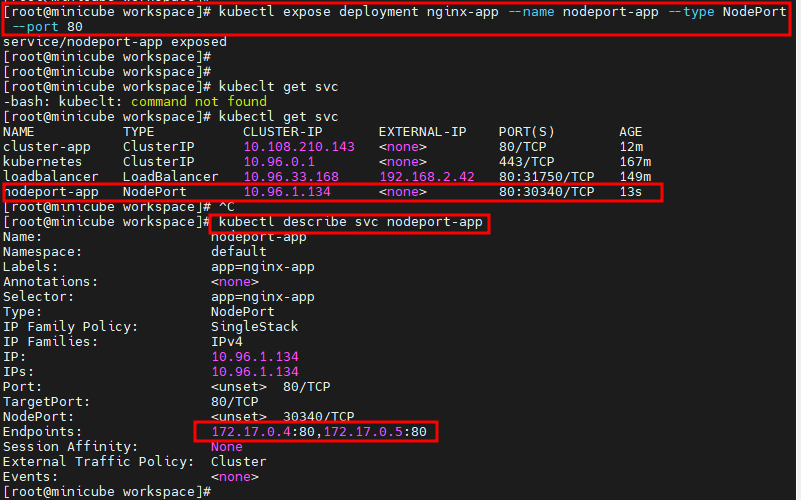
## NodePort
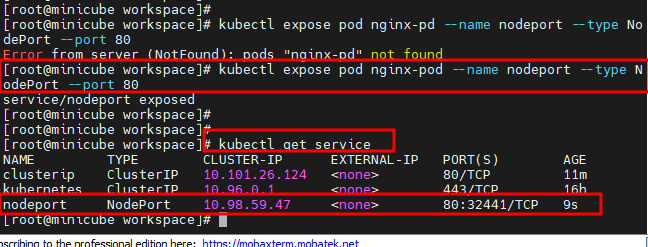
- 80 뒤에 있는 숫자는 외부에서 접근할 수 있는 포트번호고
- 80포트는 내부에서 접근할 수 있는 포트번호

- vm아이피에 node 포트번호를 붙여서 외부에서 접근
- ClusterIP도 제공하기 때문에 총 2가지의 접속 방법을 제공하는것을 볼 수있다.
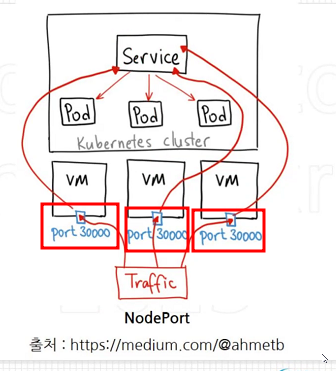
- 실습 때는 워커노드(nodeport)를 총 3개로 구성할 예정, port 번호를 다르게 한다.
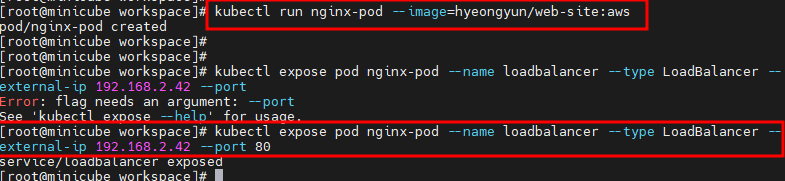
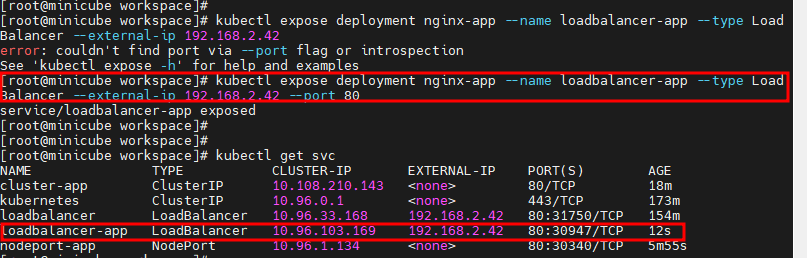
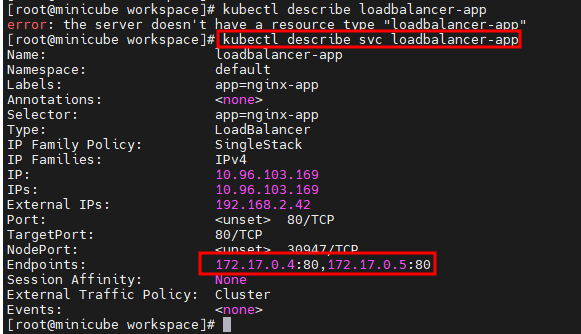
## Loadbalancer


- External_IP를 제공하고 해당 주소로 접근하면 포트번호를 적지 않아도 접근이 가능하다.
- ClusterIP, nodePort, External-IP 총 3가지의 접근 방법을 제공한다.
## describe
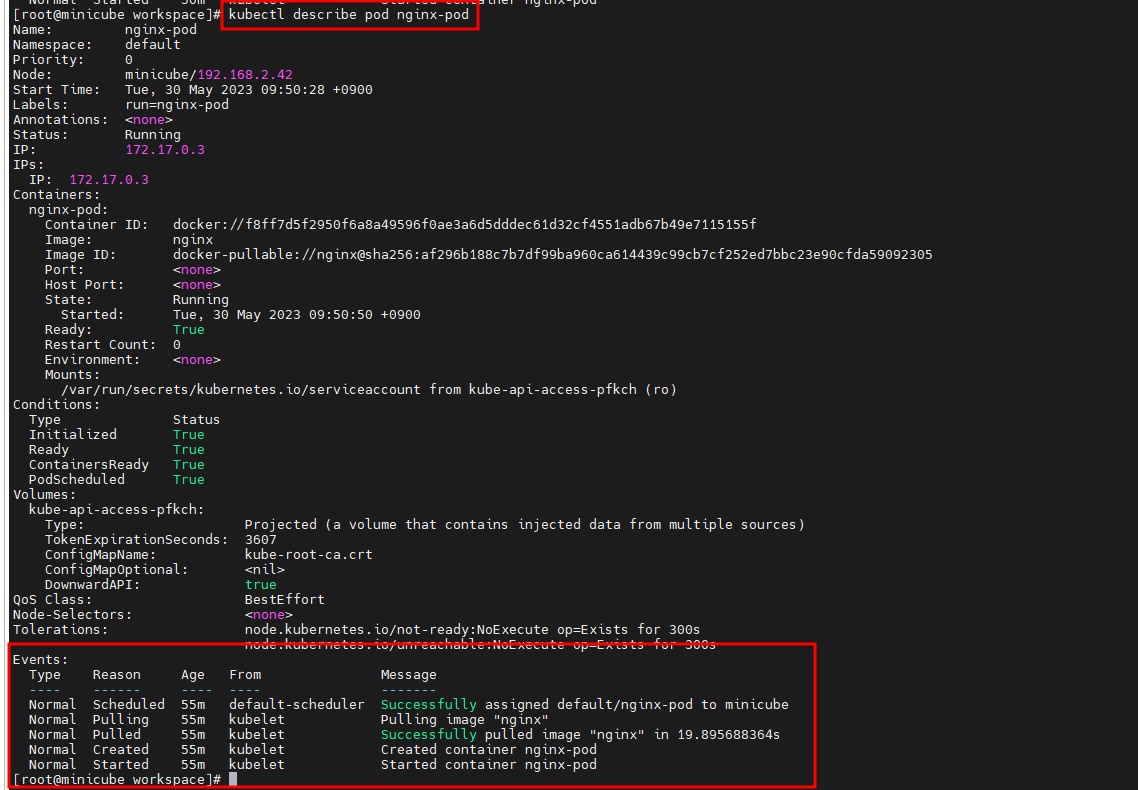
- kubectl describe pod nginx-pod 명령어를 통해서 pod에서 문제가 생긴 부분을 확인할 수 있다.
- Labels 부분은 service와 pod가 연결된 것을 보여준다.

- describe를 통해 서비스들의 정보를 확인
## pod 내부 접근

- pod 내부로 접근 후 index.html 파일 수정; 도커에서 container 접근 방식과 유사
# pod의 index.html 파일 수정
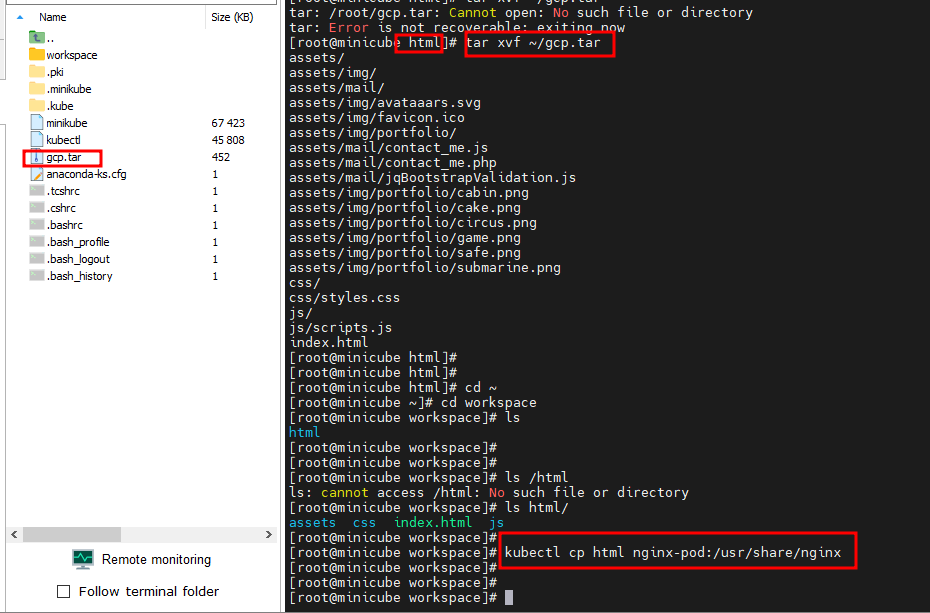
- workspace/html 경로에 gcp.tar파일을 풀고 pod 안쪽으로 복사
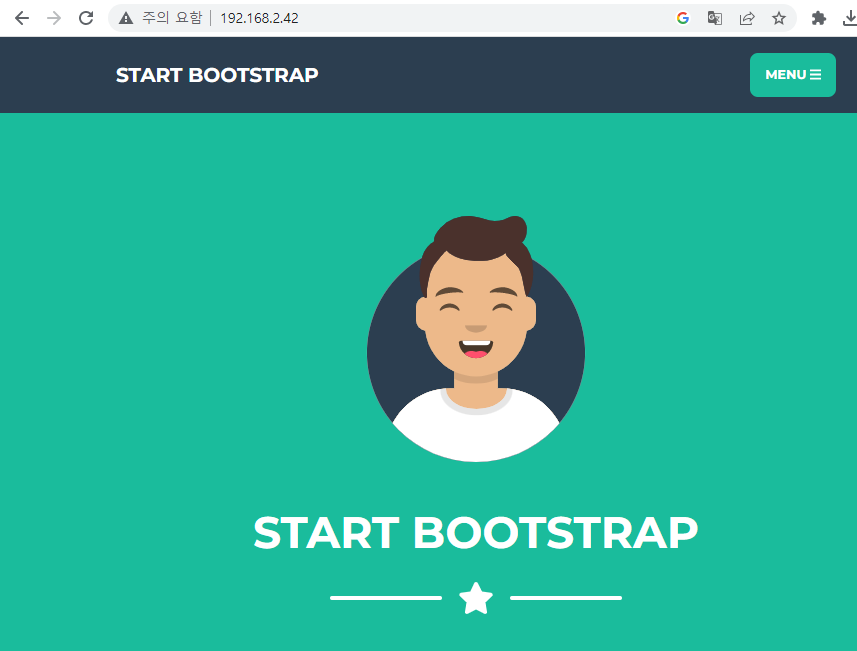
- 주소로 접근하면 결과화면을 볼 수 있음
# 삭제 명령어
# kubectl delete svc --all # 모든 서비스 지우기
# kubectl delete pod nginx-pod # 지정한 pod 지우기
# kubectl delete pod,svc --all # pod와 service 모두 지우기
# kubectl delete pods <pod> --grace-period=0 --force pod # 빠르게 강제적으로 pod를 지우는 명령어
# 기타 명령어
# kubectl options
# kubectl api-resources # api version 확인
# wide

- node의 정보를 볼 수 있는 항목이 더 많아진다.
# kubectl get nodes -o wide --no-headers # header 없이 정보 출력
# kubectl get nodes -o wide --no-headers | awk '{print $6}' # 6번째 헤더에 대한 정보를 보여준다
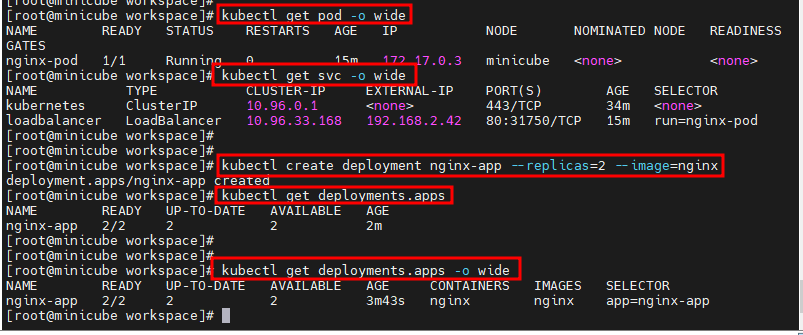
# pod 생성 후 loadbalancer 서비스 정보를 준다
# deployments
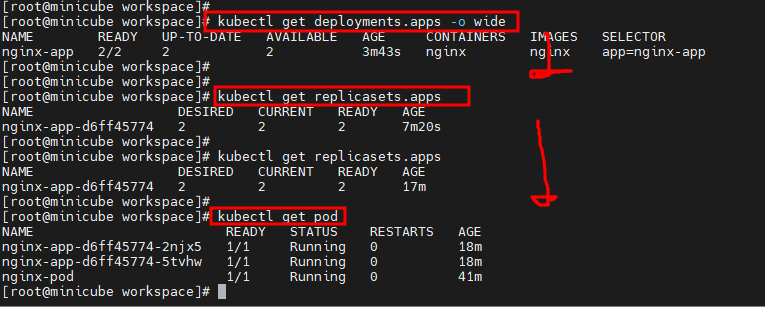
# replicasets
- deployment와 다른점은 replicas는 롤링 업데이트가 안된다.
- deployment를 하면 자동으로 replica를 생성
- 밑으로 갈 수록 더 세부적인 정보를 볼 수 있다.
- replicaset은 controller
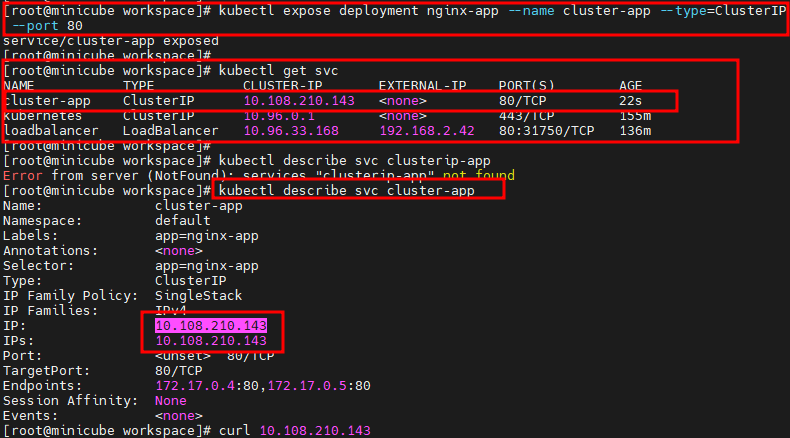
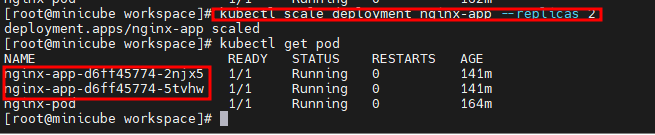
- clusterIP 서비스를 이용하여 pod 생성
- 위에서 replica=2로 선언했기 때문에 2개의 pod가 생긴다
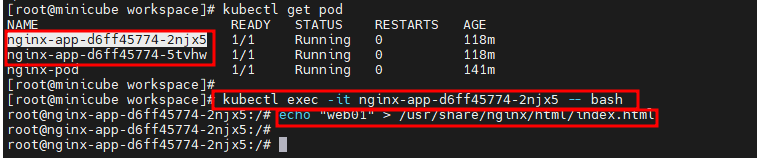
- 각각의 pod로 접근하여 index.html 파일 수정
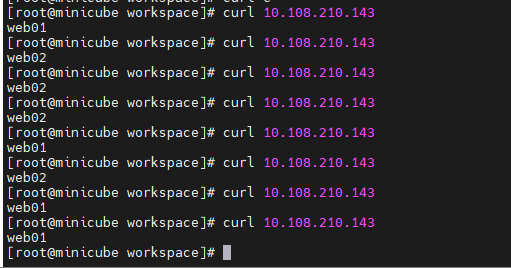
- Loadbalancing 확인
- nodeport 서비스로 pod 생성
- 이역시 로드밸런싱이 가능하다(round-robin으로 추정)
- 이번에는 로드벨런서 서비스로 생성

- pod scale out
- pod scaleIn
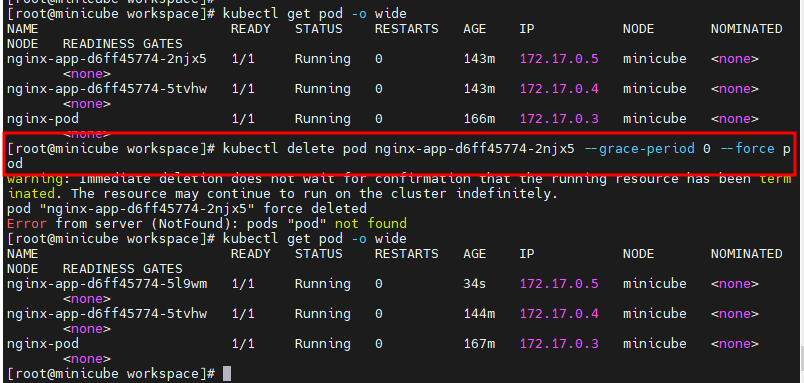
- pod를 지워도 scale 크기대로 pod가 생성된다.

- deployments를 지워야 pod가 없어진다.
# kubectl delete service --all- 모두 지우기
# 템플릿(매니페스트)으로 컨테이너 실행하기
# vi nginx-pod.yaml
apiVersion: v1
kind: Pod
metadata:
  name: nginx-pod
  labels:
    app: nginx-pod
spec:
  containers:
  - name: nginx-pod-container
    image: nginx
    ports:
    - containerPort: 80 # 별도 지정된 포트가 없다면 8080으로 지정하라 (docker -P 유사)
## cluster-ip 템플릿 생성
# vi clusterip-pod.yaml
apiVersion: v1
kind: Service
metadata:
  name: clusterip-pod
spec:
  type: ClusterIP
  selector:
    app: nginx-pod
  ports:
  - protocol: TCP
    port: 80
    targetPort: 80
kubectl edit svc clusterip-pod # clusterip-pod 수정
## nodeport 서비스 템플릿 생성
# vi nodeport-pod.yaml
apiVersion: v1
kind: Service
metadata:
  name: nodeport-pod
spec:
  type: NodePort
  selector:
    app: nginx-pod
  ports:
  - protocol: TCP
    port: 80
    targetPort: 80
    nodePort: 30080
kubectl edit svc nodeport-pod # nodeport 서비스 pod 수정
- targetport : 80 -> 8282
- 페이지 접속이 안된다; targetport는 함부로 수정해서는 안됨
## Loadbalancer 서비스 템플릿 생성
# vi loadbalancer-pod.yaml
apiVersion: v1
kind: Service
metadata:
  name: loadbalancer-pod
spec:
  type: LoadBalancer
  externalIPs:
  - 192.168.1.188
  - 192.168.1.211
  - 192.168.1.216
  selector:
    app: nginx-pod
  ports:
  - protocol: TCP
    port: 8080 # cluster-ip의 포트번호
    targetPort: 80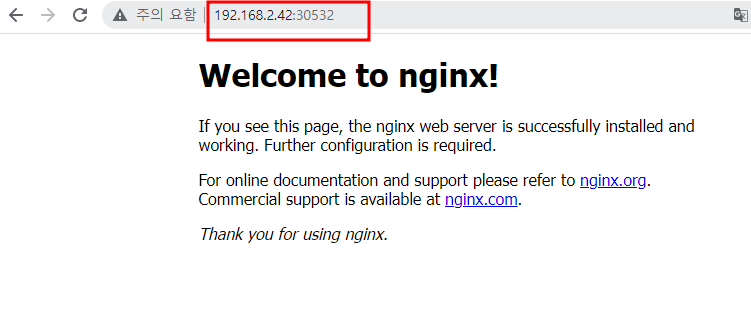
- 포트로 접근
# kubectl apply -f loadbalancer-pod.yaml
# kubectl get svc -o wide
# kubectl describe svc loadbalancer-pod
# kubectl edit svc loadbalancer-pod
# ReplicaSet
# vi replicaset.yaml
apiVersion: apps/v1
kind: ReplicaSet
metadata:
  name: nginx-replicaset
spec:
  replicas: 3 # desired state (kube-controller-manager)
  selector:
    matchLabels:
      app: nginx-replicaset

  template:
    metadata:
      name: nginx-replicaset
      labels:
        app: nginx-replicaset
    spec:
      containers:
      - name: nginx-replicaset-container
        image: nginx
        ports:
        - containerPort: 80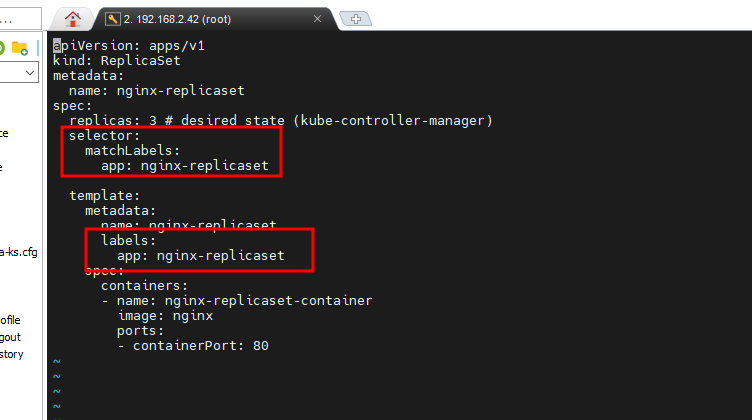
- selectors의 matchLabels 부분과 template의 Labels 부분의 app을 일치시켜줘야한다.
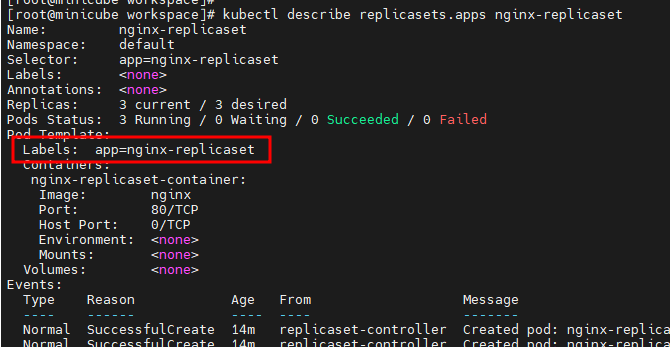
- Labels부분에서 app 부분이 nginx-replicaset인걸 볼 수 있다.
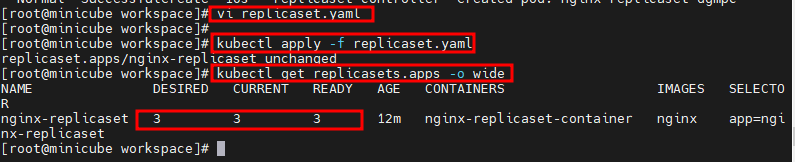
# kubectl apply -f replicaset.yaml
# kubectl get replicasets.apps -o wide
# kubectl describe replicasets.apps nginx-replicaset
# kubectl edit replicasets.apps nginx-replicaset
## 클러스터아이피 replicas
# vi clusterip-replicaset.yaml # 클러스터아이피 야믈
apiVersion: v1
kind: Service
metadata:
  name: clusterip-replicaset
spec:
  type: ClusterIP
  selector:
    app: nginx-replicaset
  ports:
  - protocol: TCP
    port: 80
    targetPort: 80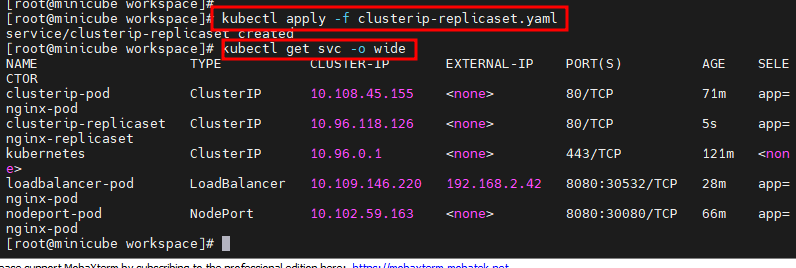
kubectl scale replicaset nginx-replicaset --replicas 3- replicas scale 조정하는 법
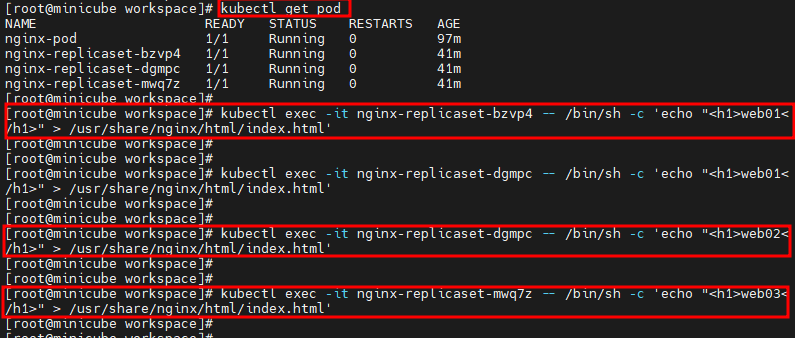
- 각 pod의 index.html 파일 편집

- Loadbalancing test
## nodeport replica
# vi nodeport-replicaset.yaml # 노드포트 야믈
apiVersion: v1
kind: Service
metadata:
  name: nodeport-replicaset
spec:
  type: NodePort
  selector:
    app: nginx-replicaset
  ports:
  - protocol: TCP
    port: 80
    targetPort: 80
    nodePort: 30080 # nodePort는 안주면 특정범위에서 랜덤으로 생성된다.
# kubectl apply -f nodeport-replicaset.yaml
# kubectl get svc -o wide
# kubectl describe svc nodeport-replicaset
# kubectl edit svc nodeport-replicaset
## Loadbalancer replica
# vi loadbalancer-replicaset.yaml # 로드밸런서 야믈
apiVersion: v1
kind: Service
metadata:
  name: loadbalancer-replicaset
spec:
  type: LoadBalancer
  externalIPs:
  - 192.168.2.42
  selector:
    app: nginx-replicaset
  ports:
  - protocol: TCP
    port: 8080 # cluster-ip의 포트번호
    targetPort: 80 # nginx default 포트
    nodePort: 30532 # node 포트 번호
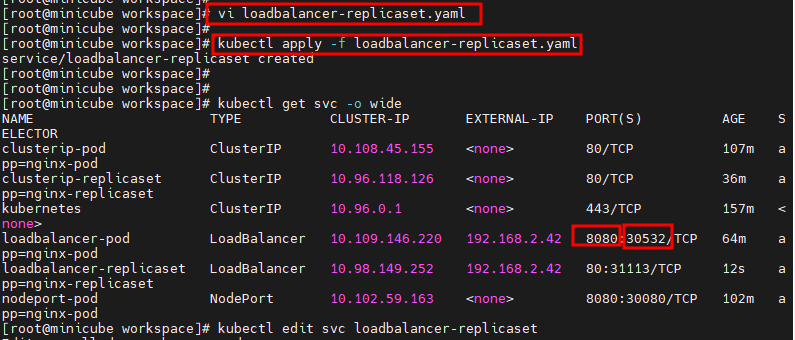
- cluster-ip의 포트번호나 nodePort 번호로 브라우저에서 접근이 가능하다
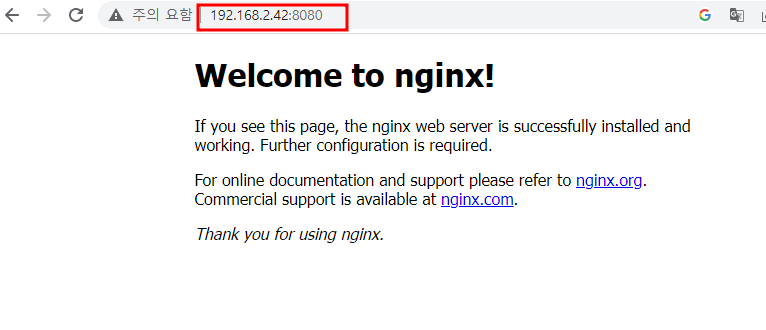

- 결과
- 포트 포워딩시 cluster-ip의 포트번호와 nodePort번호 모두 도커의 IP와 묶여서 cluster-IP의 포트번호로 외부에서 접근해도 같은 화면이 나온다

- kubectl describe pod
- 위의 사진에서 도커의 IP와 포트 번호들이 묶인다.
# kubectl apply -f loadbalancer-replicaset.yaml
# kubectl get svc -o wide
# kubectl describe svc loadbalancer-replicaset
# kubectl edit svc loadbalancer-replicaset'Cloud Solution Architect > 쿠버네티스' 카테고리의 다른 글
| Kubernetes6 (0) | 2023.06.09 |
|---|---|
| Kubernetes5 (0) | 2023.06.07 |
| Kubernetest4 (0) | 2023.06.05 |
| Kubernetes3 (0) | 2023.06.01 |
| Kubernetes2 (0) | 2023.05.31 |